The purpose of this article is to make an in-depth presentation of the REAPER Digital Audio Workstation, for beginners and advanced users.
It was originally written in mid-September 2015 for the v5.0 release, but it is regularly updated to stay up to date. Last post update: v6.0 (2019-12-04).
You won’t find REAPER in a music store. You won’t find any advertisement for it in a magazine. You won’t find it bundled with an audio interface. No box, no CD. Even the dedicated website lacks information. But in the shadows of DAW industry standards, without any real marketing strategy, REAPER is evolving, and seems to fit into all kinds of project: electronic music, audio recording, mixing, mastering, audio for video post-production, sound design, live performance, video editing, audio for video games, podcasting, audio stories, subtitles timecoding… with a flexibility that could match both beginners’ and professionals’ expectations.
With the release of v5 in August 2015 and all optimizations that came with it, it may be the perfect moment to approach the beast… and, why not, to make it yours.
But wait, what kind of beast is it exactly?

A bit of History
Every DAW has a certain philosophy, a vision of audio manipulation and ergonomics, and therefore has a story to tell. I really like the story behind REAPER and its original creator, because I find it inspiring and because it really helps to understand how REAPER became what it is now. Let me give you a summary.
Justin Frankel created Winamp audio player back in 1997 when he was 20, at a time when music player software wasn’t really able to read mp3s in a simple way or create playlists and libraries. Winamp was a huge technical innovation: this free player soon became a worldwide success. It also supported plugins and skins: not very common features at this time for this type of software. With his collaborator Tom Pepper, he also developed SHOUTcast,a protocol that allows PCs to send a media stream through the Internet (like a web radio).
Two years later, he sold Winamp, SHOUTcast and his company, Nullsoft to AOL for the sum of $80 million dollars. The story could have ended there. But it didn’t.
A few months later Justin and Tom coded a P2P protocol called Gnutella, which was used in the core of the popular Sharaeza and Limewire file-sharing software. However, because they were under AOL authority, they had to stop its development, but the protocol was already shared on the Internet.
Thanks to his notable work on network and digital audio technology, Justin was part of the innovators under 35 years old list written by the MIT in 2002.
After years of programming for music listening and sharing, and experimenting with audio processing, he decided to create a new company in 2004, Cockos, to develop a program for creating music and manipulating sounds, in total independence. REAPER (short for Rapid Environment for Audio Production, Engineering, and Recording) was born, with a strong assertion: not letting profit or other companies corrupt the author’s vision of his software.
The company remained pretty low-sized in terms of infrastructure and employees during these development years, but be sure that the people who joined Cockos have pretty high-level coding skills and a strong knowledge of audio processing.
Now in v5 since August 2015, after almost 10 years of development, the software has considerably evolved. So, how has the philosophy, ambition and technical skill of its original creator and contributors translated into REAPER 5?
Main Features
In order to showcase the potential of REAPER, I will focus on its features. I will not list all of them, only the most important ones, those that determine the core and identity of the software.
Business Model and Package Content
REAPER has a fair business model. You can download it and test it without limitations on your computer from the REAPER website, and start to use it in evaluation mode. There is no difference between trial version and registered ones, except a small pop-up that appears when you open the software, telling you that you are in evaluation mode and that you can buy the software.
After 60 days of the trial period, you are invited to buy the software, according to your revenue, starting at $60 for individuals, small companies, or educational use. The commercial license is at $225. If you don’t buy a license, you will stay in evaluation mode. No matter what license you have (evaluation, discount or commercial), REAPER is the same, without any limitations. However, REAPER is not free: Cockos does look for some profit to develop its activities. They don’t want to develop things that will block the users, preferring to work on audio-related things. Cockos’ business model is based on REAPER users’ honesty.
A license lasts for 2 major versions, so it can be used for years and hundreds of updates (almost one new REAPER release every two months).
You can even download development (pre-release) versions. If you do, you are invited to leave comments and bug reports on the Cockos forum, but you can’t expect these versions to be as stable as official releases.
An under-estimated thing: the projects you create with REAPER are not encrypted. This means that you can open them in a text editor in order to find data, or even to edit them (of course, be careful if you do that). Your editing data belongs to you, and you can modify it any way you want. This allows third-party developers to freely develop things around REAPER (we’ll see this more in details later).
Within the install setup file, you have the REAPER core, and more than 230 audio/MIDI effects, some including top-class algorithms (such as Elastique 3 and 2). Of course, all the basics are here (compressors, EQs, delays, reverb and many more). Most of them (especially those in the JSFX section) have a very minimalist interface, which some users may not find very appealing or modern. The notable feature of JSFX is to allow users to edit or code their own effects from within REAPER, providing standardized UI elements to allow quick development (more on JSFX later). Most REAPER plugins sound really great and are pretty flexible, but you might prefer the use of third-party effects to have the most advanced UI in certain circumstances, or different controls, or of course, different results.
No sample libraries or virtual instruments (except for two minimalist synths) are in the install package. I don’t think this is a problem, as I tend to avoid native synths and sounds. Not everyone needs to have built-in sounds or synths (radio, audio recording usages for example). For an absolute beginner who wants to start electronic music, it requires a bit of preparation before starting to make music (finding and downloading synths and loops online), but nothing is impossible, and being able to do that is a skill that you should have no matter what DAW you use.
Not having included sounds and instruments, and having most effects without fancy GUI is a way to keep the software lightweight, and to focus development on compatibility, performance, stability and features.
Compatibility
REAPER is cross-platform between Windows and Mac, and usable on Linux (in beta). 32 and 64 bit versions are available.
You can even install a portable version of REAPER, to run it from a USB or a network drive without having to actually install it on your computer. Some people install it on Dropbox to sync their configuration between multiple computers. It also allows you have several installations of REAPER on the same computer (if there are several users, it can be very useful), without any drop in performance compared to a regular installation.
Portable installations are also made possible by the fact that REAPER is very lightweight: all features that are described in this article (and others that are not described here) fit in a 10MB file! iTunes is 15 times larger. This should give you an idea of the level of code optimization which has been done by Cockos’ team.
REAPER supports a lot of plugin types (VST, VST3, AU, DX, JSFX), audio drivers (Asio, Wasapi, WaveOut, DirectSound…), a large number of audio formats (wav, wav64, aif, ogg, mp3, flac, REX…), video formats (mp4, avi, mov,…) and even picture format (gif, jpg…) and other protocols such as MIDI, MusicXML, OSC, Sysex, Mackie Control and Rewire. All standards are supported are on REAPER product page.
You can use REAPER for 3D audio (ambisonic), and 360° video (you can rotate in the image thanks to the Video Processor).
Performance
When you launch REAPER for the second time, you will be amazed how fast it is to open (the first time, it has to scan your VST directories). Less than 1 second even on some old computers without SSD.
You can have unlimited tracks, audio items, and effects (on tracks or on items) per projects. No artificial limitations here. Virtual Instruments are treated like any other effects, so you can put them anywhere on the track effects (FX) chain.
The optimization is very impressive. I have some projects with more than 80 effects including several convolution reverb plugins, 80 tracks and thousands of audio files at 96kHz, 24 bits, and it didn’t hit more than 10% of my CPU. Sure, the buffer has to be adjusted for such projects but it is possible to play them without any drop-outs and without having to render. Some third-party plugins can be really CPU intensive and can hit several per cents of the CPU alone, but the REAPER core is highly optimized, and you can make pretty intense projects, even on low-end computers.

For huge projects, you can make another computer render the VST FX, via a LAN process called ReaMote. It can also be handy if you have a silent but not very powerful computer in your recording room, and if you need to have more computing power.
You can open and play several projects at the same time. You can even route the signal from one project to another. There is also an experimental feature that allows projects to be imported to other projects (PiP) but unfortunately, it doesn’t seem to be on the radar for future updates. You can also have projects inside other projects (a feature called subprojects), a feature highly appreciated by people who make sound for films.
You can have up to 512 different inputs and 512 different outputs, and up to 64 audio channels per track.
The stability is really great, and there is a system (a Bridge) to prevent REAPER from crashing if an unstable plugin has a problem. In order to avoid bad surprises, you can always activate automatic project backups saving.
Flexibility
Because it doesn’t try to mimic hardware based workflow, you have very few limitations related to tracks and routing. Apart from the master track, where you cannot put any items (audio or MIDI elements), there is only one track type. You can put any kind of items (audio – mono, stereo or multi-channel, MIDI, video, image or text) on a single track, one after the other or even overlapping.

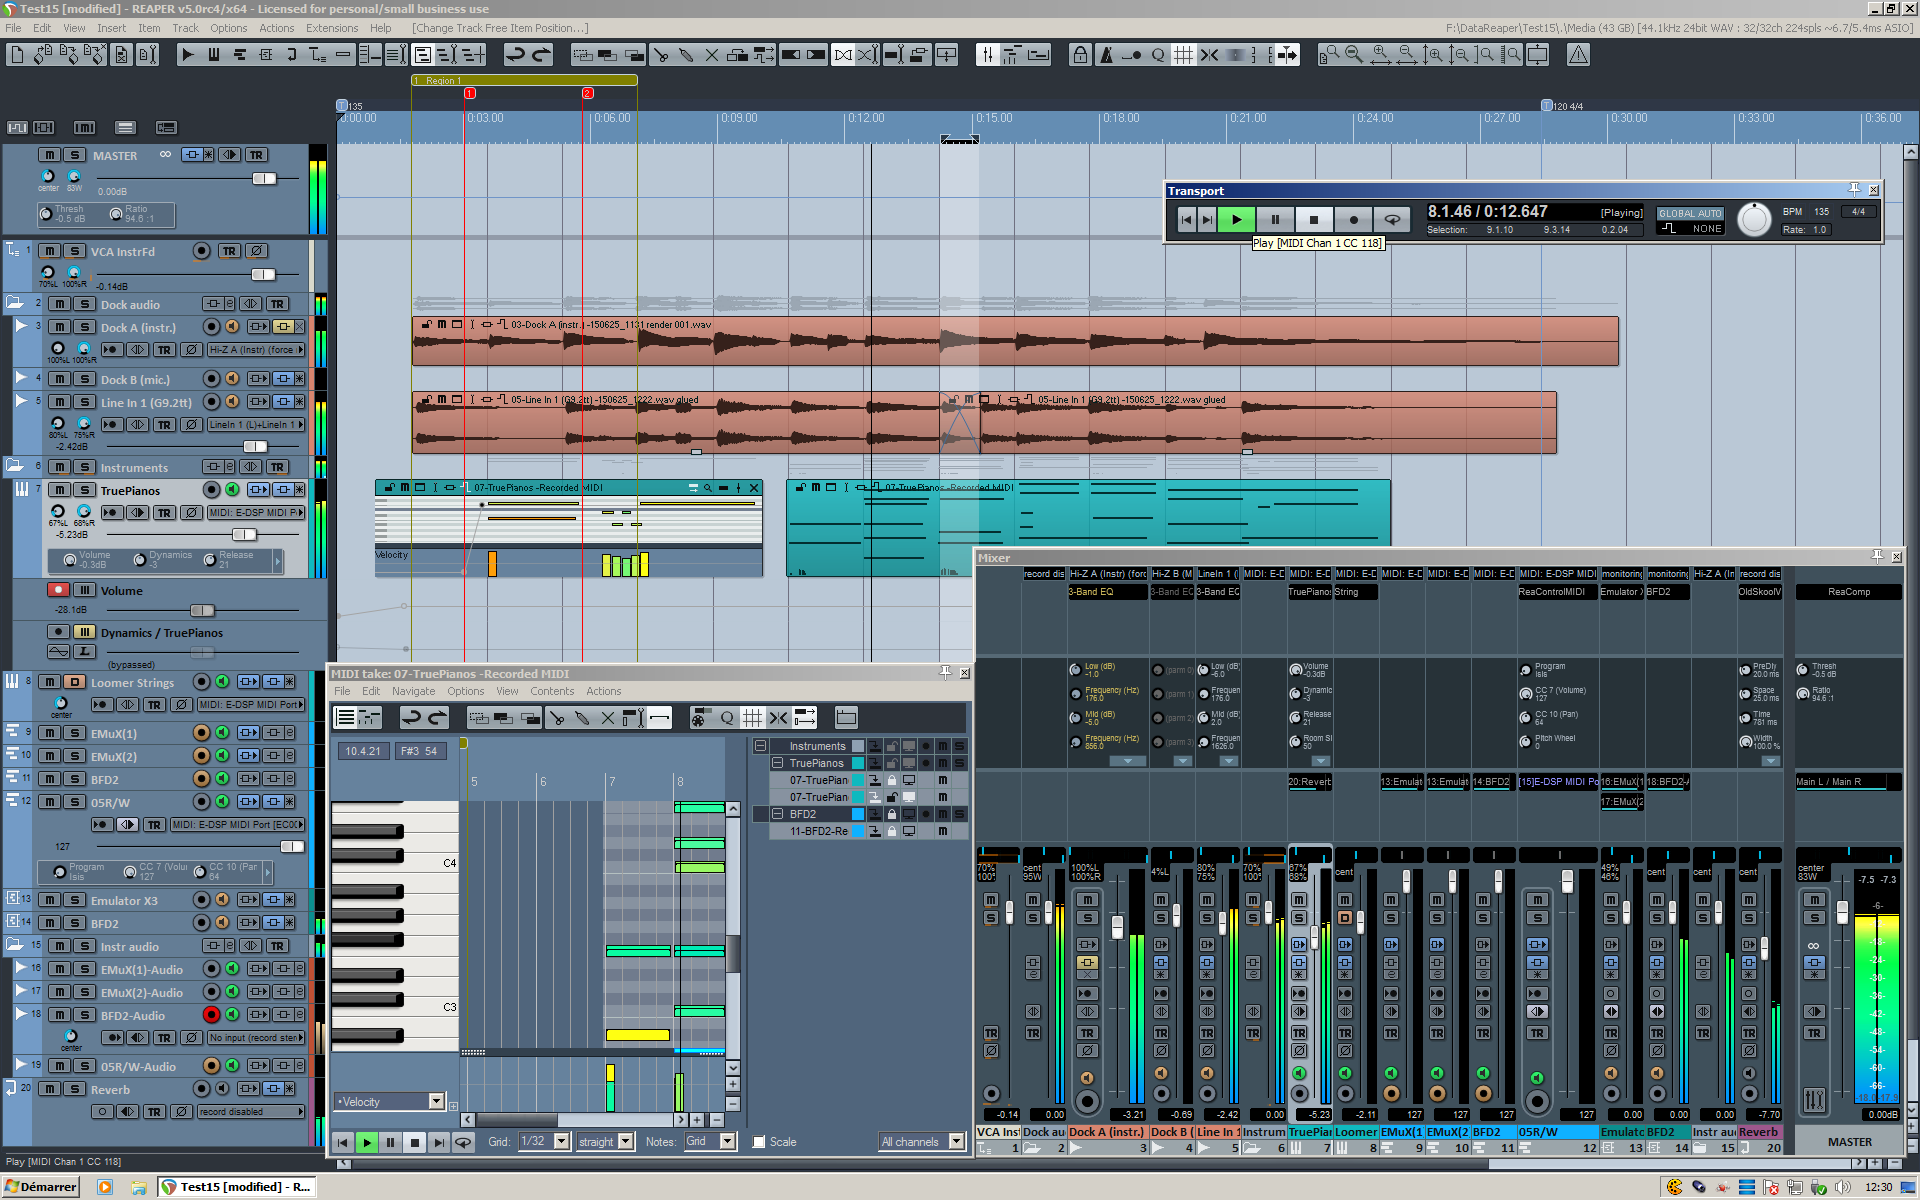
In terms of routing, any track can work as a group/folder or as an aux/bus. They can be organized in Parent/Child relationship: signal going from a child track goes into its parent, so if you adjust any parameter of the parent track, it is applied on the sum of the signals of its child tracks. This is how you can create group tracks in REAPER. Look at the screenshot above to see how a group track (here on top in grey) is able to display a visualization of the sum of the peak signals of the audio items and of the MIDI notes representation of its child tracks, which is very nice way to align objects, and to create automation.
Since v5 of REAPER, tracks can also work as VCAs for other tracks.
Every track can have as many sends and returns as you want. To help you organize the routing, you can use the Routing Matrix, which displays and allows you to edit all the routings of your project. You can also route signals through different projects, and record track outputs rather than inputs.

Tracks’ visibility can be controlled using the Track Manager. You are also able to make some basic track operations from here (record, mute, solo) and to see the latency or FX chain of any track.

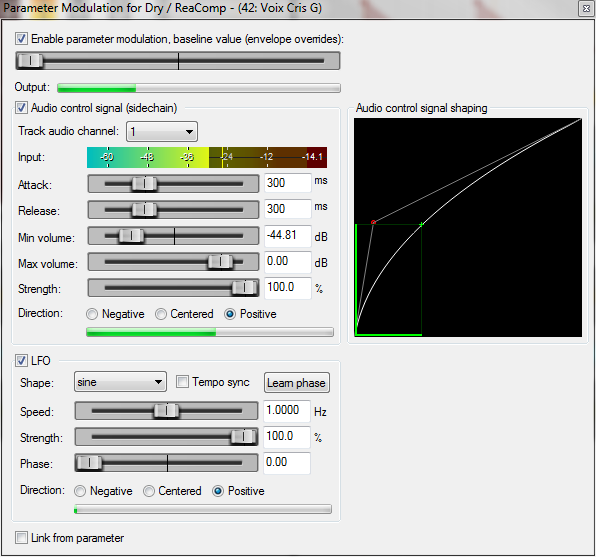
FX parameters can be controlled via Parameter Modulation, a powerful way to link parameters to each other, or to a LFO, or even to an audio signal, which is very nice for creating some kind of auto-wahs and side chains, even if the plugin doesn’t natively support it. It works very well on overdrive as well: you can adjust gain setting according to input volume, which is very handy.
You can of course modulate FX parameters and track properties with several writing modes thanks to automation envelopes. There is a nice parameter filter to let you find very quickly the parameter your want to automate. Note also that every FX has an additional wet/bypass control, which is useful to use with plugins that don’t provide it.

V5.50 also introduced Automation Items, a nice way to encapsulate consecutive envelope points to create patterns which you can duplicate, modify, save for other projects etc… You can even put one over another!

Audio
REAPER item workflow is completely non-destructive. You can create fades, modify length, rate, add stretch markers (a way to warp audio item source content), apply FXs on items, create automation envelopes to these item FXs and to some native item properties (volume, pitch, pan, mute) without rendering, but if you want to do one anyway, you can use the Glue function.

Items can also be grouped so that any transformation to one item of a group is applied on the others, if Group Editing is activated (of course you can temporarily deactivate it if needed).
You can also move items using the Ripple Editing system. When it is active, moving an item back or forth in time will make all next items move the same way, without having to make a selection. It can be used on a single track only or across all of them, which is especially useful in compositions and in audio story projects.
For audio items, REAPER has a Takes system, which means that you can have several versions of an audio/file segment stacked and grouped, and only the take set as active will be processed at play (the others are muted). Takes can be created right at the recording, but I prefer to record in Lane mode (a simple way to layer items one of top of each other, without grouping them), and to use takes only at the editing stage.

There is also a great Dynamic Split tool, which can analyze a sound and add stretch markers at transient, gate opening or closing. It can also split the sound into several items if you prefer.

A new features introduced in v5.32 is the Spectral Peaks waveform view. When activated, your items waveforms will be colored, based on their pitch. The color can be repeated every X octave. This feature can be especially useful for sound design, virtual instrument creation, and DJing, to instantly see which sounds are low, which are medium and which are high.

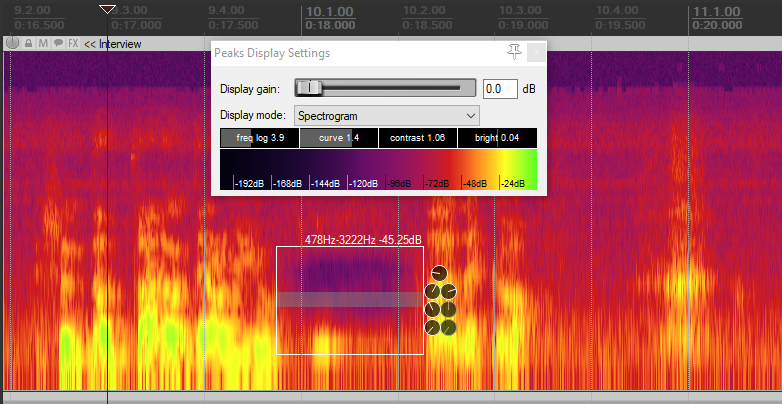
V5.50 also introduced spectrogram view and spectral editing. It is pretty basic and not as detailed as dedicated software, but it can be very helpful anyway.
MIDI
I will not detail all the MIDI related features, most of them are pretty basic (that is, they work like many other DAWs), but I’ll just spotlight some of which I found especially cool when I started using REAPER.
Creating a loop is as easy as extending the item length. It also works with audio (and can be disabled if required). You can even use the MIDI pool function, a way to create a instance of an item, so that if you modify one MIDI item, all other instances of the item in the pool are modified too. Loops and several items can be merged together into a single item by using the Glue function.
You can rename Notes on the piano roll, which is very convenient when you use samplers. With some samplers, like the built-in one or TX16Wx, the Note names automatically change to the name of your sample. Very handy!
There is also an advanced Quantize Events window with parameters for note start, note end, length and a strength of quantization. The grid can even support swinging groove. At the opposite, you have a humanize function, which could be more complex, but does the job by randomizing note timing and velocity.
Notes can be restricted to a chosen scale, which is useful when composing a song in a particular key.
Another a great thing is, you can edit several MIDI items at the same time, even if they are not on the same track!

Update: v5.20 now has a built-in Notation Score Editor. Note duration is made by Click and Drag, just like MIDI notes, which is very handy! It is pretty basic for now, it can already helps a lot those who are more used to scores than with MIDI notes usual representation.
MusicXML import/export is possible. PDF export is also available.
Video Editing
You can now have several video objects in a project and make HD video edits in REAPER. Using external libraries for playback (VLC for example), ensures that your computer will be able to play it without any lag, in a wide variety of formats and resolutions, which is especially convenient for ADR, music illustrations and sound design. Of course, you can make video render as well. That said, I’m disappointed that video items don’t look any different to audio ones (no icon or image preview in the timeline).
You can also apply video effects (resizing, cropping, picture in picture, text on image and more) using the Video Processor Effects. This effects processor is meant to be directly scriptable so it appears with controls on the left, and code on the right. This is a bit disturbing for most users who just want to tweak some knobs without having to look at source code, but it does the job. I appreciate REAPER’s invitation to coding, but personally I think that source code should only be viewable with another button press, like the JSFX editor. The default GUI can indeed be a bit disturbing.
Anyway, if you are looking for advanced video editing (professional grading, visual effects) REAPER is not the way to go. Having the possibility to play and edit video is very convenient for adding sound to video, but it will not replace a dedicated video editing software. The point is only to make sound for video easier by allowing nice previews, format compatibility and basic editing. It helps a lot already!

With third-party software I will speak about later, you will understand why REAPER has become a DAW of choice for video post-production projects.
Regions and Markers
You can define markers and regions in your project. It is a nice way to define a song part, or to write any other information. It also be used to define sections for rendering.
With the powerful region matrix, you can render files according to certain tracks, depending of the regions. This is very useful in sound design.
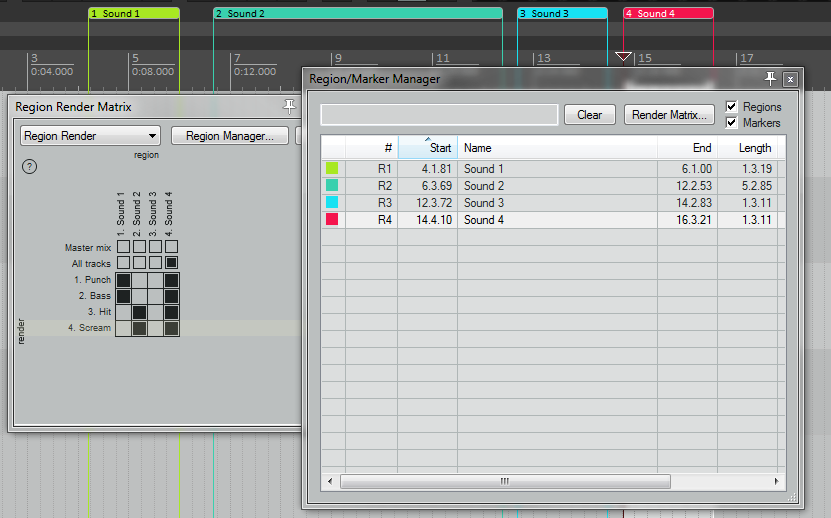
Despite the fact that there are some nice native actions related to Markers and Regions (especially concerning navigation in the project through markers and regions), they are pretty basic: you can’t have several sets of regions or markers. Fortunately, extensions and scripts added a lot of functionalities to them – region sets, region notes and so on. More on this later. Because you can set variables (wildcards) in exported file names, it is very easy to make a samples library with REAPER or a Kontakt instrument.
Customization
There are so many different types of projects that can be done in a DAW. The best way to satisfy the maximum of needs? Let the users be able to customize the way the software looks and behaves!
In REAPER, just about any process you can think of can be triggered by an Action. These are listed in the Actions window (which contains more than 4500 actions in vanilla REAPER 5). You can filter the list by typing some keywords, and only the actions with the provided keywords will appear. You can then set any action to toolbar button, keyboard shortcut or a MIDI/OSC trigger.
You can even assign actions to different mouse actions according to certain context, by using Mouse Modifiers. This is in fact one of the key principles of REAPER editing: you don’t have a palette of mouse tools like in other DAW, in which to have to click on the split tools to be able to split the cursor, the stretch tool in order to stretch items with the mouse etc… In REAPER, all mouse actions are context sensitive, triggered by keyboard shortcut, and can these actions can be changed thanks to the actions system. It is simpler and faster to make edits this way cause you don’t have to remember, as you can do a lot with “one tool” only.

In the Actions window, you can also create Custom Actions (otherwise known as macros), combinations of several actions executed one after the other, that can be triggered just like any other regular actions. These Custom Actions can save you a lot of clicks!

You can also customize the appearance of REAPER by downloading Theme files (if you don’t like the default look of REAPER, you can download one of the hundreds of others’ themes created by users), or just customize a theme by modifying its settings. Interface customization can go pretty far, but some elements are not theme-able, because they are created using OS-dependent functions (scrollbars for example), so some panels may not look exactly the same on Windows and Mac, but I think using system libraries is way to keep the install package light and get higher performance. Some cross-platform inconsistencies in appearance are the cost of this.
I think that it could be nice to have full vector based theming system, like with Melda Productions Plugins, as it could allow a very quick customization (like adjusting the global lightness of the interface), and may be more optimized for very high resolution. But sure, we can also do great things with image-based theming too. Just take a look at the examples below:

The different windows and toolbars can be placed all around the screen(s) using a Dock system, that gives you a certain freedom over your workspace organization. It is not the best dock system I have ever seen (I am quite fan of the Adobe one), but it works nicely with multiple screens.
Because you can export your configuration in a zip file and import it back into REAPER, you can reload all your preferences (shortcuts, toolbars, themes, projects templates, FX chain templates etc) from anywhere, and also share them with others.
All this customization power comes at a price: you will need to take a bit of time to set your configuration in order to make it work seamlessly for you. For newcomers to REAPER, some users, including myself, share “beginners configs” in order to have more accessible settings, with lots of toolbars and buttons for actions that are often used in projects. I personally dislike most of the default keyboard shortcuts, maybe because I was used to other software, so my configuration has a complete re-mapping of the shortcuts.
Modularity
The concept behind modular software is being able to add features to them or to modify the way they work without touching their core.
REAPER comes with a pretty huge API, which means that developers can code extensions for REAPER, or with scripts, which are advanced custom actions (they can even have an interface or run in background continuously), and share them with others. Many feature requests have been satisfied this way.
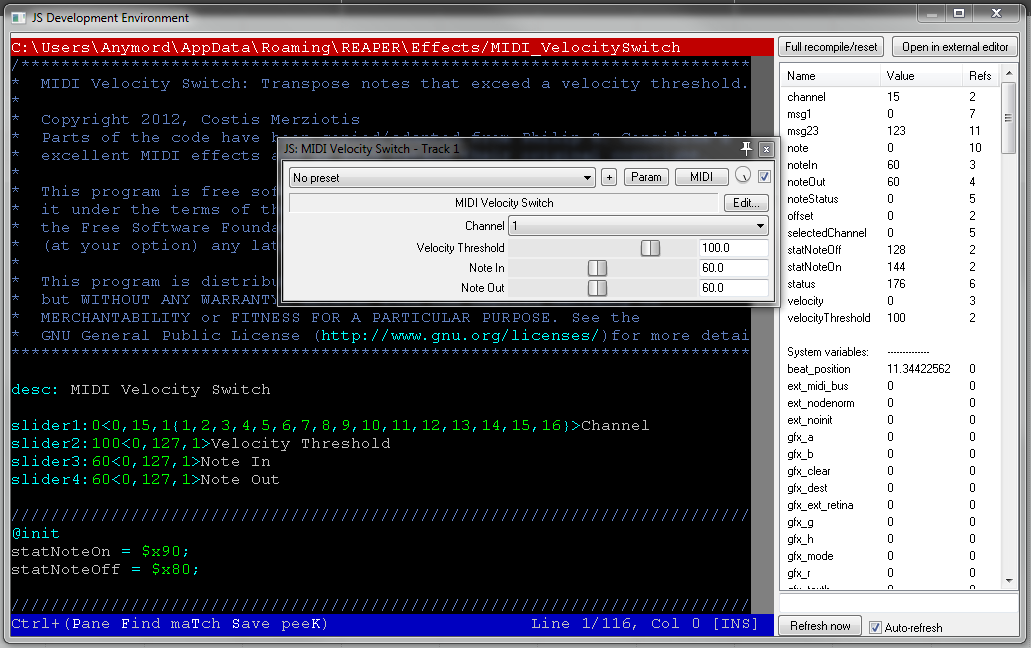
You can also create your own audio/MIDI effects as JSFX plugins, as mentioned earlier, in a much easier way than if you had to create your own VST. Cockos provides a plugin pack called ReaPlugs in which you can find REAPER’s VST (if you need to use them with another DAW), and the great thing is that the pack has an effect called ReaJS, which is able to load your JSFX plugins, making use of JSFX plugins outside REAPER possible.
Scripts can be coded in EEL (a REAPER specific language), Lua (a very common scripting language, integrated in REAPER 5), and in Python (another very common scripting language). The first two are interpreted natively, which makes sharing easy, whilst the last one requires an installation of the Python library. For extensions, the language used is C++.
So many languages supported, so many possibilities to add new features. That’s what I call modularity!
With new REAPER v5, you can now create these scripts and effects within REAPER, thanks to a built-in code editor.
Thanks to new functions available for scripters, we can now create very powerful things. From the ReaScript community has emerged some really impressive features, such as a multitrack Loudness over time graph synced to the projects (regions of the projects appear in the visualization, something that no VST can do), a region/markers manager that supports sets of regions (something I use in every project), an advanced quantization engine for items and stretch markers supporting swing/strength/gravity, a lot of scripts for subtitling workflow, item editing, item property, automation, and more. Almost anything that has a value in your projects (items, envelopes, regions, tracks) can be modified by scripts.
Scripting is definitely a thing that changes the way I work. For my projects, I built unique tools answering very specific needs, things that couldn’t have been made in other DAWs. It is also a way to indirectly contribute to REAPER development, and make it being able to do even more things than it can natively do. The funny thing is that some custom features just need few lines of code and minutes of programming, but can save a lot of time.
Extensions Spotlight
As you can see, REAPER already has a lot to offer natively, and scripts can do yet more. Let’s see how to go even further!
SWS/S&M
If you have to download only one community resource, it should be the free open-source SWS/S&M Extension. This is a lightweight package, initially created and maintained by community members, which brings more than 2700 new actions to REAPER. Furthermore, it also brings functions that can be used by scripts or other extensions, extending REAPER modularity.
With SWS/S&M, you will also be able to make a lot of things that REAPER can’t do natively. Warping the tempo grid with the mouse, learning and applying groove from/to MIDI notes, creating snapshots of tracks, renaming your items with variables, analyzing the loudness of items, playing only the item under the mouse for quick preview, having a nice item/region/marker notes editor, some marker actions (like a way to trigger actions when the play cursor goes over it). There are a lot of cool things in it!
The top maintainer of the project has been hired by Cockos last year, so REAPER, and SWS/S&M are now developed together: a REAPER update is often closely followed by a SWS/S&M one. Update (2016-17-05: JeffOs is not part of the team anymore).
Playtime
If you want to use REAPER in live configurations or for electronic music, you may consider using Playtime by Helgoboss. This extension contains a Session View in REAPER, in which you can load samples and loops, and trigger them via MIDI. The performance can be recorded as editable looped items, linked to their source files.

ReaPack
This brand new free and open source extension (June 2016), coded by cfillion, is a package manager which allows to download user created resources right from REAPER. It has been designed for scripts (ReaScripts and JSFX), but in the long run, it may support themes and other kind of files. It is one of the greatest example of Cockos community work.
Right out of the box, it will bring you more than 500 new actions created and shared for free by members (including my free scripts pack). Some of these actions are pretty basic but others are really advanced stuffs, exploiting the true potential of REAPER modularity.
Users contributions used to be a bit painful to managed and update. Now, thanks to ReaPack, everyone can enjoy them in a very convenient and easy way!
Web Browser Interface
This extension integrated in v5.30 allows you to control REAPER transport (play, pause, record…) and track states (mute, armed for recording, monitor, name…) remotely from another device, like a smartphone or a tablet. This can be especially useful for people who have to record themselves, typically, for home studio usage.

By clicking on a track, you can even get access to its volume fader. You also have markers and regions navigation, clip indicator etc…
And as always, this is totally modable : you can code and style your own version with HTML, CSS and JavaScript, like any other web page, and even add your own buttons to trigger other REAPER actions that are not present on the original interface.
A upcoming version (v5.60) will be adapted for headphones mixes, so that you can let the people your record to adjust their own headphone mixes.
Third-Party Tools
Because REAPER is so modular, a review about REAPER potential would be incomplete without speaking about some third-party applications that have been developed with REAPER in mind.
Conversion
As a NLE/DAW project converter, AATranslator has not been developed for REAPER in particular. However, because REAPER project files are not encrypted (unlike a lot of other DAW project formats), REAPER is really well supported. You can then easily convert OMF, AAF, EDL, Pro Tools, Live, Audition, Ardour, Samplitude files (among a lot of other possibilities) into REAPER projects.
The developer is very active on REAPER forum.
Video Post-Production
If you want to do audio-for-video type of work, I strongly advise you to use Vordio, which is able to convert XML from Premiere Pro or Final Cut into REAPER projects. Rather than just convert it, it smartly creates the projects according to labels that have been set to audio clips in the video editing software. For example, when you convert a project, rather than keeping original audio track structure made by the video editor, Vordio is able to group under the same folder elements that have been defined as Dialog, FX, Ambiances etc. A more mix-oriented approach of the project structure!
Vordio is also able to make a re-conformation: if the video editor sends you a new modified version of the original XML he sent you, you will be able to merge the changes into your project, without losing your own editing (track structures, effect settings etc). This kind of function has just been added into last version of Nuendo, but was already available for REAPER.
Community
Support
It is said that the REAPER forum community is one of the best things you will find in the REAPER package. As long as you are polite, you can be pretty sure that you will get an answer from another user. It is the best place to find assistance, as a lot of passionate people are really happy to share their expertise in order to help others.
The forum is also the place to report bugs and feature requests, as threads are regularly read by Cockos team members.
So, if you have any question and can’t find the solution by yourself, or if you have a bug or a feature request; Join the community!
Learning
All of that is pretty complex. So, how to learn to use REAPER?
At first sight, starting REAPER may be a bit confusing. After a pop-up invites you to set up your audio input/output (okay so far), Reaper will fall back on an empty project, with an About pop-up on top. No tooltip helpers, no link to tutorials or “where to start” indications and no project template. The few buttons on the default toolbar don’t really help either. Just double-click on the left panel to create a track, and the fun can begin.
You will progressively need to do some actions that you can’t easily find by yourself, so take a look in the Actions window. From there, you will be able to run these actions, set them to keyboard shortcuts or to toolbar buttons. You may even feel the need to customize mouse behavior and to tweak other settings in the Preference options.
It doesn’t seem that REAPER default configuration has been designed to fit a particular type of project, so customization is necessary to make your workflow more efficient. If you don’t find what you want, just search on the internet, it may be named in a different way, or it may not be a native (or even existing) action.
For a faster start, you could take a look at some other users’ configuration files, but they may not all be dedicated to absolute beginners, or they may have settings that you don’t like any more than the default ones.
If you want to learn from the pros, there is the great REAPER User Guide that you can download from the REAPER website itself, written by a REAPER user, Geoffrey Francis. This is the thing to read if you want to know all about the software, and it is has a very user-friendly approach (it is not just a feature list, it is a real guide through the software).
You can also watch the very nice Kenny Gioia video tutorials, on REAPER’s website or its channel, especially the REAPER 5 explained video playlist. He also makes affordable DVD training.
It’s worth following the unofficial REAPER blog by Jon Tidey, where you can learn a lot of tricks, and you can also look for articles about the REAPER community (interviews, extensions showcases, courses etc).
You can take a look at the ReaperTV beautiful website by PsmegTV, which has a lot of high quality video tutorials, sorted by categories (mixing, recording, editing etc…).
Of course, you can also find a lot of tutorials in YouTube from different users, in a lot of different languages.
Resources
A lot of things have been created and shared by community users. Themes, Scripts, Translations, Config Files, Languages files and so on. There is a website, the REAPER Stash, where most users share the resources they have created. It could have a more modern presentation, and be more ergonomic for uploaders, but there are a lot of great things in there.
For finding resources created by people who prefer to host their files on their own platforms (extension creators especially), the forum is the first place to look.
Verdict
REAPER may not be perfect, and will certainly not fit everyone’s taste, from a design, or a workflow point of view (that’s why there are so many DAWs on the market). But, as you can see, it has a huge amount of features to offer, and because it evolves every day, you definitely have to keep an eye on it.
Its reasonable price, its performance optimization, flexibility, and modern approach to track organization and item editing makes it suitable not only for beginners with low-end computers, but also to power users and professionals working on complex projects. The latter can push the software even further with scripts and extensions, thanks to its incredible modularity, satisfying a wide variety of workflows, even very specific ones. That’s exactly why companies such as Harmonix, Ubisoft, the BBC, Electronic Arts, Soundiron and others switched to REAPER at least for a part of their workflow.
This review is very technical. I’ll leave you to look at REAPER, explore it and experience it by yourself – one other great advantage of having the possibility to freely download !
There is no need to learn all the manual before starting: once you have taken a few minutes to set up your configuration, you will be ready to go. With a beast like that, I can assure you that you can go very far, maybe further and faster that you could have ever imagined in your DAW adventure.
Thanks to Mary and MP who helped me review and correct this long article. That was a pretty intensive job, thank you very much guys!
Thanks also to Punk Duck for its huge correction pass! Sincerely.
And thanks to xpander, another volunteer in the correction team !
Oh, and, side note: this is not only my longest article, but it is also the 100th I published on my website! Let’s keep rollin! 🙂
This article has been promoted on
- The exhaustive REAPER 5 review | The REAPER Blog
- Free DAW Software! (Digital Audio Workstations) | BPB
- REAPER 5: An Exhaustive Review – Cockos Confederated Forums
Thanks for sharing !